
4-8 Week Guidelines
Return to Weekly Guideline Home Page, click on button below
General Guidelines:
Schedule your Physical Therapy Appointment for 8-12 weeks after your Surgery Date
No Lifting > 10 lbs.
No Kegels
No Sexual Intercourse
No Strenuous Physical Activities
No Bathing- Shower Only
Avoid Strenuous Household Chores*
Avoid Bending at the waist
TIPS FOR HEALING:
Sleep: You can continue to use the bolster if you choose
Straining: Follow your provider’s recommended bowel regimen to prevent straining during bowel movements.
Drink plenty of water to help with movement of bowels
Strenuous Household Chores: Click here or see below for additional tips.
Incision Care: Tips are located below for specific incision care
Movement and Exercise: For Guidance on Safe Movement and Exercise, see below
Movement Techniques:
Transitional Movements:
When moving between positions, such as from sitting to standing, rolling over in bed, or getting out of a car, use the technique "blow as you go."
-Begin exhaling as if blowing through a narrow straw, and continue this breath throughout the entire movement.
UPDATED: Coughing or Sneezing:
You will no longer need hold the abdominal wall but with coughing or sneezing, keep your head upright to avoid pressure onto the pelvic floor.
If you were to bend your head forward, this may increase your chance of leakage as it closes the throat and increases pressure downward.
The Lunge Lift:
Use this technique when you might not have a stable surface. If you are unable to drop the back knee to the ground, that is okay. Go as low as you feel comfortable with.
Being in a standing position and near the item you want to pick up.
Keep trunk upright and step back with one foot to lower your body towards the item.
Tip: Place the hand that is not reaching for the object on your front leg to keep your more steady.
Keep your back straight throughout the motion and blow through a narrow straw, and continue this breath throughout the entire movement.
Golfer’s Lift:
Use this technique when picking up light weight items off the floor like a shoe or sock
Stand near a stable surface and the item you want to pick up.
Hold onto chair, back of couch, bed, countertop with one hand while using the other to reach for the object.
When reaching down towards the object, allow the the opposite leg come off the floor behind you (the leg closest to the the stable object).
Keep your back straight throughout the motion and blow through a narrow straw, and continue this breath throughout the entire movement.
Additional Movement Techniques
Stairs: use handrails (if possible), go slowly (no running up or down stairs)
Walking Routine: Increase time and distance gradually gradually increase time and distance
Keep pain levels at a 3/10 or below (everyone will be a little different)
Watch weather - stay away from icy, slippery or rainy surface
Falling will increase your pain
If walking on a treadmill - increase your incline to ~ 2%
CONTINUED Exercises:
You are more than welcome to continue any of the previous exercises from earlier weeks that best fit your schedule.
Diaphragmatic Breathing
Begin lying on your back with your knees bent and feet resting on the floor or you can place your knees over a pillow.
Inhale, allowing your chest and abdominal wall expand. Exhale allowing your chest and abdominal wall to recoil to the starting position.
Towel roll with breathing
Begin lying with your knees bent and a rolled towel positioned vertically along the middle of your back.
Placed your hands on your chest and abdominal wall and perform the diaphragmatic breathing. You can also outstretch your arms and hold.
Seated Twist with Breathing
Sit upright in a chair with your hands placed on your lower ribs.
Rotate to one side as you inhale, allowing your ribs to expand into your hands.
Return to the starting position as you exhale, letting your ribs come together.
Standing Chest Stretch
Stand upright in a corner, placing your forearms on the wall at shoulder height (lower if needed for comfort).
Take a small step forward and gently lean your chest toward the corner until you feel a stretch.
Keep your shoulders relaxed and away from your ears.
Trunk Rotation
Lie on your back with knees bent and feet flat on the floor.
Keeping your back flat, slowly rotate your knees toward the floor on one side, feeling a stretch along your trunk.
Hold briefly, then rotate to the opposite side.
Tip: Exhale as you rotate to each side, and inhale as you hold.
Backstrokes
Being laying on your back. You can keep your legs straight or bent.
Extend one arm straight overhead, moving it towards the floor. Hold, then bring it back to the starting position and repeat with your other arm.
NEW Exercises: Start at 6 Weeks

Glute Bridge
Begin lying on your back with your knees bent and feet hip width apart.
Slightly tuck your tailbone (like a dog in trouble) and lift your butt muscle to up towards the ceiling. Exhale out, blowing through a skinny straw. Return to the starting position and repeat.
Make sure to keep your feet (toes and heels) planted into the ground when you lift.

Core Marching
Begin lying on your back with your arms resting at your sides, or on your lower abdominal wall; Keep your knees bent and your feet flat on the ground.
Exhale out through a skinny straw to engage the abdominal wall and slowly raise one of your legs off the floor, keeping your knee bent. Then return to the starting position and repeat with your other leg.
Tip:Make sure to keep your trunk steady during the exercise and do not let your low back arch.

Prone Scapular Retraction
Lie on your back with your legs either bent or straight.
Place your arms at your sides, then slowly sweep them up toward your head as if making a snow angel.
Bring your arms back down to your sides and repeat.
Tip: Keep your fingertips in contact with the floor, and avoid overarching your back as your hands move overhead.
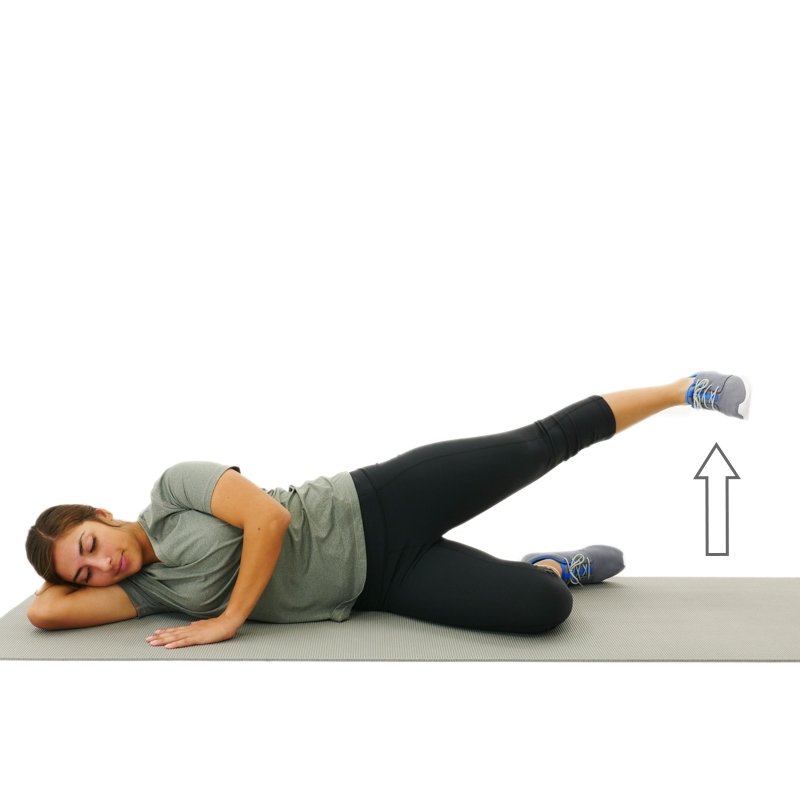
Sidelying Hip Abduction
Lay on your side with your top leg straight and your bottom leg bent.
Keeping your top leg in line with your body, lift up towards the sky.
Do not let your hips roll forward or back. Exhale out while you lift up.

Squat or Sit to Stand (no weight):
Begin standing upright with feet about shoulder width apart.
Inhale as you bend down or sit back towards a chair. Exhale as you stand up.
Tip: plant your feet into the ground (big toe, little toe and heels) and push up to stand.

Against the Wall Marches
Stand in an upright position with your hands against the wall.
As you exhale out through a skinny straw, lift one knee up to hip height and lower back down. Repeat on other leg.
Incision Care:
Abdominal Scar Mobilization:
Do Not work directly on the scar
Continue to monitor for infection
Indirect Approach: with light pressure - see 1st image to right
Move in a small circular motion about 3-4 inches away from the scar
If the abdominal wall or scar feels sensitive, you can grab a tissue and perform light sweeps around and on the scar to help desensitize the scar.
Direct Approach: Start touching directly on the scar with sweeping or brushing motions.
Limit any direct deep pressure to the scar.
Avoid wearing clothing that can irritate the incision (i.e. jeans, tight pants)
If steri strips were used, they typically fall off at the 3-4 week mark
When incision is closed: use a silicone scar sheet
I.e: Scar Away
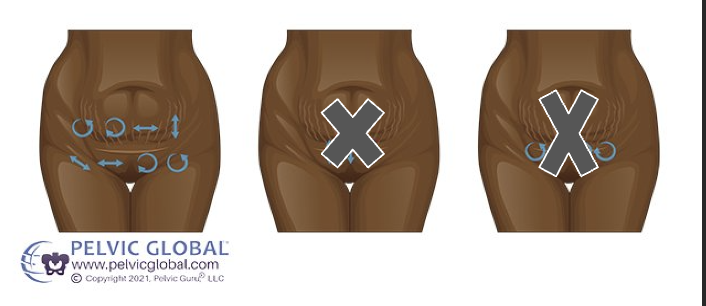
Image used with permission from Pelvic Guru ®, LLC www.pelvicglobal.comAdditional Tips:
Use the lifting techniques above to help pick up light objects from the ground, continue to avoid bending over at the waist.
No lifting >10 lbs.
Continue to minimize household activities but if unavoidable, practice the tips below:
Vacuuming
Dance forward and back with the vacuum or walk forward and back keeping your back upright
Making your bed
When tucking the corners on the fitted sheet, perform a split stance or try to keep your back straight if your bed is lower.
Laundry:
Use lifting techniques stated above
Keep weight of basket under 10lbs
Limit carrying the laundry basket up and down stairs
When folding laundry, find a surface that you do not need to bend over
Cooking:
Limit cooking to 30 minutes
If the meal takes longer, try some prep work in a seated position such as mixing or chopping
Car Trunk: lifting items out of the back of a car (i.e. groceries)
Bring items close to you as possible
Bend knees, exhale out prior to lifting and while picking up the bag
Use the golfer’s lift when the items are light
Avoid bending straight over
Reduce loads into the house
Do not lift anything about 10 lbs.
Shoveling snow, lawn mowing, raking leaves, gardening: Set up help with a neighbor or a member to assist with these task.