
3-4 Week Guidelines
Return to Weekly Guideline Home Page, click on button below
General Guidelines:
Schedule your Physical Therapy Appointment for 8-12 weeks after your Surgery Date
No Lifting > 10 lbs.
No Kegels
No Sexual Intercourse
No Strenuous Physical Activities
Avoid Strenuous Household Chores*
Avoid Bending at the waist
TIPS FOR HEALING:
Rest: Take 20-30 minute naps. Resting frequently during the first couple of weeks supports healing, especially if you’re experiencing fatigue or low energy.
Sleep: Use a bolster or place a pillow under your knees if sleeping on your back, or a pillow/blanket between your legs if sleeping on your side.
Suggestion for Bolster: Forias Wedge Pillow for Sleeping 12" Bed Wedge Pillow
Straining: Follow your provider’s recommended bowel regimen to prevent straining during bowel movements.
Drink plenty of water to help with movement of bowels
Incision Care: Tips are located below for specific incision care
Movement and Exercise: For Guidance on Safe Movement and Exercise, see below
Movement Techniques:
Transitional Movements:
When moving between positions, such as from sitting to standing, rolling over in bed, or getting out of a car, use the technique "blow as you go."
-Begin exhaling as if blowing through a narrow straw, and continue this breath throughout the entire movement.
Coughing:
Place pillow along your lower abdominal wall, bring your hand to your mouth (not shown in video), keep head upright and cough.
Log Roll:
Lie on Your Back: Start by lying flat on your back with your knees bent, feet flat on the bed.
Turn Your Body as a Unit: To roll onto your side, bend your knees slightly, then slowly roll your body as a single unit, keeping your shoulders, hips, and knees aligned. Avoid twisting or rotating your torso separately from your hips.
Use Your Arms for Support: Once you’re on your side, place your hands on the mattress to help push yourself up. Let your arm closest to the bed press into the mattress as you bring your legs off the bed.
Push to a Sitting Position: While lowering your legs over the edge, press through your arms to push your upper body into an upright, seated position.
Adjust and Stand: Once sitting, take a moment to ensure you’re stable, then use your legs and arms to stand up safely.
Additional Movement Techniques
Stairs: use handrails (if possible), go slowly (no running up or down stairs)
Walking Routine: Increase time and distance gradually gradually increase time and distance
Keep pain levels at a 3/10 or below (everyone will be a little different)
Watch weather - stay away from icy, slippery or rainy surface
Falling will increase your pain
If walking on a treadmill - keep incline at 0%
New Technique
Golfer’s Lift:
Use this technique when picking up light weight items off the floor like a shoe or sock
Stand near a stable surface and the item you want to pick up.
Hold onto chair, back of couch, bed, countertop with one hand while using the other to reach for the object.
When reaching down towards the object, allow the the opposite leg come off the floor behind you (the leg closest to the the stable object).
Keep your back straight throughout the motion and blow through a narrow straw, and continue this breath throughout the entire movement.
The Lunge Lift:
Use this technique when you might not have a stable surface. If you are unable to drop the back knee to the ground, that is okay. Go as low as you feel comfortable with.
Being in a standing position and near the item you want to pick up.
Keep trunk upright and step back with one foot to lower your body towards the item.
Tip: Place the hand that is not reaching for the object on your front leg to keep your more steady.
Keep your back straight throughout the motion and blow through a narrow straw, and continue this breath throughout the entire movement.
CONTINUED Exercises:
Diaphragmatic Breathing
Begin lying on your back with your knees bent and feet resting on the floor or you can place your knees over a pillow.
Inhale, allowing your chest and abdominal wall expand. Exhale allowing your chest and abdominal wall to recoil to the starting position.
Towel roll with breathing
Begin lying with your knees bent and a rolled towel positioned vertically along the middle of your back.
Placed your hands on your chest and abdominal wall and perform the diaphragmatic breathing. You can also outstretch your arms and hold.
Ankle Pumps
Begin lying on your back with your feet elevated.
Slowly pump your ankles by bending and straightening them. You can also perform ankle circles.
Heel slides
Begin lying on your back with your legs bent.
Slowly slide one heel on the floor and return. Keep trunk steady, alternate to the other leg and repeat.
Try not to twist your body or arch your low back.
Seated Knee Extensions
Begin sitting upright position.
Slowly straighten one knee, hold and then lower it back o the starting position.
Backstrokes
Being laying on your back. You can keep your legs straight or bent.
Extend one arm straight overhead, moving it towards the floor. Hold, then bring it back to the starting position and repeat with your other arm.
NEW Exercises:
Seated Twist with Breathing
Sit upright in a chair with your hands placed on your lower ribs.
Rotate to one side as you inhale, allowing your ribs to expand into your hands.
Return to the starting position as you exhale, letting your ribs come together.
Trunk Rotation
Lie on your back with knees bent and feet flat on the floor.
Keeping your back flat, slowly rotate your knees toward the floor on one side, feeling a stretch along your trunk.
Hold briefly, then rotate to the opposite side.
Tip: Exhale as you rotate to each side, and inhale as you hold.
Snow Angels
Lie on your back with your legs either bent or straight.
Place your arms at your sides, then slowly sweep them up toward your head as if making a snow angel.
Bring your arms back down to your sides and repeat.
Tip: Keep your fingertips in contact with the floor, and avoid overarching your back as your hands move overhead.
Standing Chest Stretch
Stand upright in a corner, placing your forearms on the wall at shoulder height (lower if needed for comfort).
Take a small step forward and gently lean your chest toward the corner until you feel a stretch.
Keep your shoulders relaxed and away from your ears.
Shoulder Rolls
Sit upright with feet on the ground and arms at your sides.
Inhale as you roll your shoulders up toward your ears, then exhale as you roll them down and away from your ears.
Perform either forward or backward rolls as desired.
Shoulder Pinches
Stand or sit upright with arms at your sides.
Gently squeeze your shoulder blades together, then relax and repeat.
Keep your shoulders down and relaxed, avoiding lifting them toward your ears.
Incision Care:
Abdominal Scar Mobilization:
Do Not work directly on the scar
Continue to monitor for infection
Indirect Approach: with light pressure - see 1st picture on the image
Move in a small circular motion about 3-4 inches away from the scar
If the abdominal wall feels sensitive, you can grab a tissue and perform light sweeps around scar to help desensitize the scar.
Avoid wearing clothing that can irritate the incision (i.e. jeans, tight pants)
If steri strips were used, they typically fall off at the 3-4 week mark
When incision is closed: use a silicone scar sheet
I.e: Scar Away
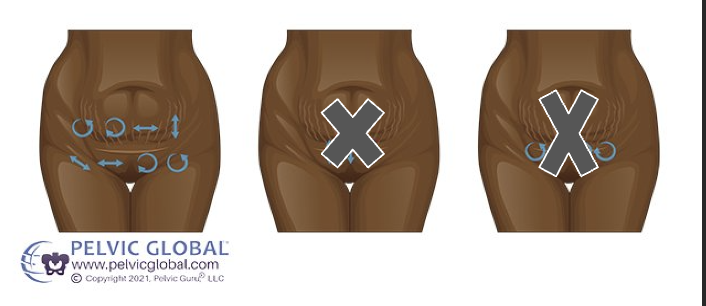
Image used with permission from Pelvic Guru ®, LLC www.pelvicglobal.comUse the lifting techniques above to help pick up light objects from the ground, continue to avoid bending over at the waist.
Continue to minimize household activities (vacuuming, emptying dishwasher, picking up dog poop, lifting a stack of dishes overhead)
No lifting >10 lbs.
Start preparing smaller meals, washing/drying dishes or cleaning off surfaces
Build up standing endurance for more than 30 minutes