
8-12Week Guidelines
Return to Weekly Guideline Home Page, click on button below
General Guidelines:
At 8- plus weeks, you may have a follow up with your surgical team to determine your progress. At this time, typically you are released to resume activity.
Lifting restrictions may still be in placed based your your surgeons recommendation
Kegel program is initiated
Returning to intercourse is typically advised at this time, confirm with your surgeon.
Gradually resume strenuous physical activity
Resume baths or showers
TIPS FOR HEALING:
Physical Therapy: At this time you can initiate formal pelvic floor physical therapy at 8 weeks.
Straining: Continue to follow your bowel routine to prevent constipation and straining.
Drink plenty of water to help with movement of bowels
Strenuous Household Chores: Resume any house activities but remember breathing mechanics and tips provided in 4-8 week guidelines.
Incision Care: Tips are located below for specific incision care.
Movement and Exercise: Around 8 weeks post-op, many patients are cleared to begin gentle pelvic floor and core exercises. As healing continues and pelvic floor coordination improves, this can progress to more advanced strengthening and functional movements by 12 weeks and beyond. If recovery is on track, the following exercises can be safely incorporated into your workout routine to support mobility and overall strength.
Mobility Exercises:

Open Book Rotation
Begin
UPDATED: Coughing or Sneezing:
You will no longer need hold the abdominal wall but with coughing or sneezing, keep your head upright to avoid pressure onto the pelvic floor.
HIP INTERNAL ROTATION STRETCH - SITTING LEVEL 1
While seated, place one leg rotated one direction and the other rotated in the opposite direction as shown. This will help to stretch the hip internal rotators of the leg that has the foot positioned to the side of your body. Place your hands behind you to support your body for the lightest version (level 1) of this stretch series.
The Lunge Lift:
Use this technique when you might not have a stable surface. If you are unable to drop the back knee to the ground, that is okay. Go as low as you feel comfortable with.
Being in a standing position and near the item you want to pick up.
Keep trunk upright and step back with one foot to lower your body towards the item.
HIP ADDUCTOR AND INTERNAL ROTATION STRETCH - QUADRUPED
Start on your elbows and knees in a crawl position with your knees spread wide apart and feet turned outward as shown. Next, lower your buttocks back and down while keeping your lumbar spine flat, until a gentle stretch is felt in your hip internal rotators and adductor muscles. Hold, return to starting position and repeat.
Golfer’s Lift:
Use this technique when picking up light weight items off the floor like a shoe or sock
Stand near a stable surface and the item you want to pick up.
Hold onto chair, back of couch, bed, countertop with one hand while using the other to reach for the object.
When reaching down towards the object, allow the the opposite leg come off the floor behind you (the leg closest to the the stable object).
Keep your back straight throughout the motion and blow through a narrow straw, and continue this breath throughout the entire movement.
Additional Movement Techniques
Stairs: use handrails (if possible), go slowly (no running up or down stairs)
Walking Routine: Increase time and distance gradually gradually increase time and distance
Keep pain levels at a 3/10 or below (everyone will be a little different)
Watch weather - stay away from icy, slippery or rainy surface
Falling will increase your pain
If walking on a treadmill - increase your incline to ~ 2%
CONTINUED Exercises:
Diaphragmatic Breathing
Begin lying on your back with your knees bent and feet resting on the floor or you can place your knees over a pillow.
Inhale, allowing your chest and abdominal wall expand. Exhale allowing your chest and abdominal wall to recoil to the starting position.
Towel roll with breathing
Begin lying with your knees bent and a rolled towel positioned vertically along the middle of your back.
Placed your hands on your chest and abdominal wall and perform the diaphragmatic breathing. You can also outstretch your arms and hold.
Seated Twist with Breathing
Sit upright in a chair with your hands placed on your lower ribs.
Rotate to one side as you inhale, allowing your ribs to expand into your hands.
Return to the starting position as you exhale, letting your ribs come together.
Standing Chest Stretch
Stand upright in a corner, placing your forearms on the wall at shoulder height (lower if needed for comfort).
Take a small step forward and gently lean your chest toward the corner until you feel a stretch.
Keep your shoulders relaxed and away from your ears.
Trunk Rotation
Lie on your back with knees bent and feet flat on the floor.
Keeping your back flat, slowly rotate your knees toward the floor on one side, feeling a stretch along your trunk.
Hold briefly, then rotate to the opposite side.
Tip: Exhale as you rotate to each side, and inhale as you hold.
Backstrokes
Being laying on your back. You can keep your legs straight or bent.
Extend one arm straight overhead, moving it towards the floor. Hold, then bring it back to the starting position and repeat with your other arm.
Exercises: 8 Weeks

Glute Bridge
Begin lying on your back with your knees bent and feet hip width apart.
Slightly tuck your tailbone (like a dog in trouble) and lift your butt muscle to up towards the ceiling. Exhale out, blowing through a skinny straw. Return to the starting position and repeat.
Make sure to keep your feet (toes and heels) planted into the ground when you lift.

Core Marching
Begin lying on your back with your arms resting at your sides, or on your lower abdominal wall; Keep your knees bent and your feet flat on the ground.
Exhale out through a skinny straw to engage the abdominal wall and slowly raise one of your legs off the floor, keeping your knee bent. Then return to the starting position and repeat with your other leg.
Tip:Make sure to keep your trunk steady during the exercise and do not let your low back arch.

Prone Scapular Retraction
Lie on your back with your legs either bent or straight.
Place your arms at your sides, then slowly sweep them up toward your head as if making a snow angel.
Bring your arms back down to your sides and repeat.
Tip: Keep your fingertips in contact with the floor, and avoid overarching your back as your hands move overhead.
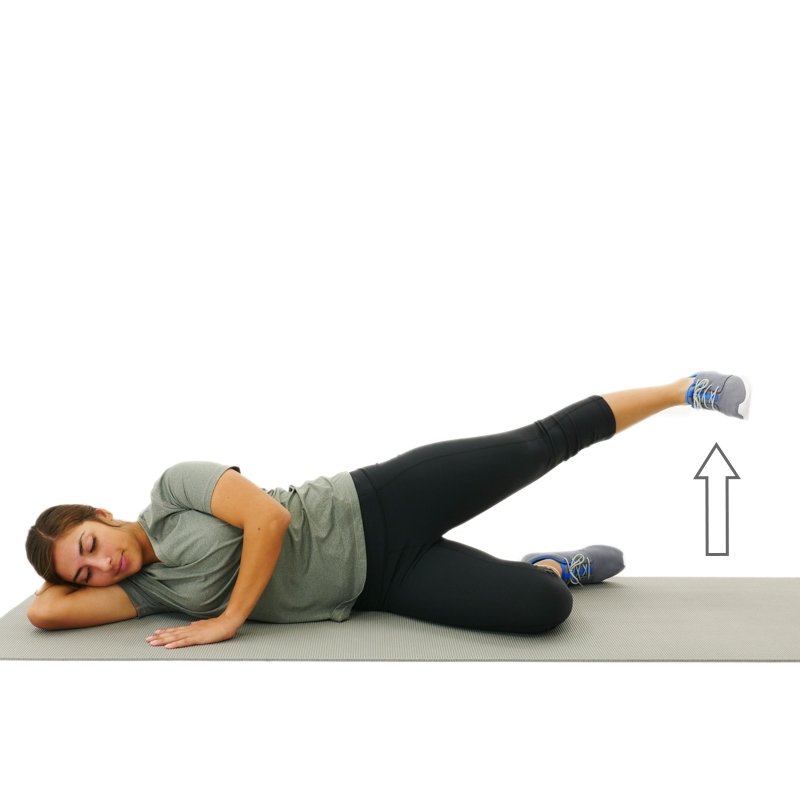
Sidelying Hip Abduction
Lay on your side with your top leg straight and your bottom leg bent.
Keeping your top leg in line with your body, lift up towards the sky.
Do not let your hips roll forward or back. Exhale out while you lift up.

Squat or Sit to Stand (no weight):
Begin standing upright with feet about shoulder width apart.
Inhale as you bend down or sit back towards a chair. Exhale as you stand up.
Tip: plant your feet into the ground (big toe, little toe and heels) and push up to stand.

Against the Wall Marches
Stand in an upright position with your hands against the wall.
As you exhale out through a skinny straw, lift one knee up to hip height and lower back down. Repeat on other leg.
Incision Care:
Abdominal Scar Mobilization:
Purpose: To reduce scar tissue buildup, improve tissue mobility, relieve tightness, and support better core and pelvic floor function.
Step-by-Step Instructions
Before You Begin
Wait until the incision is fully closed and healed (usually 6–8 weeks).
Get your surgeon or pelvic PT’s approval before starting.
Wash hands thoroughly.
Use a gentle lotion, vitamin E oil, or unscented moisturizer (optional but helpful for glide).
Position Yourself
Lie comfortably on your back with knees bent and supported.
Expose the scar area but keep warm and relaxed.
⏱How Often?
5–10 minutes, 3–5 times per week.
Stay consistent — tissue mobility improves gradually over time.
Stop or Modify If:
You feel sharp pain, burning, or discomfort
The area becomes red, swollen, or irritated
You notice increased bleeding or drainage

Vaginal Scar Mobilization:
You may notice that the opening of the vaginal canal feels restricted, leading to discomfort during activities, prolonged sitting, or penetrative intercourse. Like an abdominal scar, this area can benefit from gentle massage to improve blood flow, enhance tissue mobility, and reduce sensitivity. Gentle scar massage can help stretch and mobilize the restricted tissue without increasing pain, promoting greater comfort and function over time.
Vaginal dilators can helpful tool to gently stretch and mobilize scar tissue in the vaginal wall, improve elasticity, reduce pain or restriction, and prepare for comfortable penetration. Always get clearance from your provider before starting.
What You’ll Need:
A set of medical-grade vaginal dilators (progressive sizes)
Water-based lubricant
A quiet, private space
Before You Start:
Bladder should be empty.
Find a comfortable, reclined or semi-reclined position with knees bent and supported.
Practice diaphragmatic breathing to relax your pelvic floor before insertion.
Aftercare Tips:
Do a few minutes of diaphragmatic breathing or pelvic floor relaxation after each session.
Monitor for increased discomfort or spotting — a small amount may be normal at first, but ongoing pain should be discussed with your provider.
Keep the dilators clean per manufacturer instructions.
When to Stop or Seek Guidance:
Sharp pain, burning, or bleeding
No progress over several weeks
Emotional distress or anxiety during use
You’re unsure if the restriction is from muscle tension vs. scar tissue
Dilator Options:
1) Intimate Rose Dilators: use code Susan4 for $5.00 off
2) V-Well Dilators: use SusanMiller15 for 15% off
3) Soul Source
4) CMT Medical Website: multiple options
Massage Techniques (5–10 Minutes, 1–2x/day)
1. Light Touch Warm-Up
Place fingers lightly on or around the scar.
Do gentle circular strokes over the area for 1–2 minutes to increase circulation.
This also helps desensitize the skin if it feels sensitive.
2. Vertical and Horizontal Stretching
Place two or three fingers across the scar.
Gently move the skin and tissue up and down (vertical), then side to side (horizontal), as if you're trying to shift the skin without sliding your fingers across it.
Hold each stretch for 3–5 seconds, repeat 5–10x in each direction.
3. Circular Tissue Mobilization
Use circular motions with your fingertips directly over the scar.
Apply just enough pressure to move the underlying tissue (not just rubbing the surface).
Spend 30–60 seconds at a time, moving along the length of the scar.
4. Scar Lifting (if tolerated)
Pinch the scar gently between your thumb and fingers.
Lift it slightly and hold for a few seconds, then release.
This helps improve mobility in deeper layers.
Only do this if it’s comfortable and not causing pain or pulling.
Step-by-Step Instructions:
Start with the smallest dilator and apply a generous amount of lubricant to the tip and sides.
Gently insert the dilator into the vaginal opening at a comfortable depth — just past the scar or area of restriction. There should be no sharp pain.
Hold the dilator in place for 1–2 minutes, focusing on relaxed breathing and softening the pelvic floor.
Mobilization techniques:
Sweep or rock side to side or in small circles to gently stretch the tissue.
Hold gentle pressure against areas of tightness or scar tissue for 30–60 seconds, allowing the tissue to relax.
Avoid force or deep insertion — the goal is gentle stretch, not pain.
Duration: Start with 5–10 minutes, 3–5x per week, based on comfort and tolerance.
Progress slowly to the next size only when the current one is fully comfortable and keep pain level at or under 3/10.

Image used with permission from Pelvic Guru ®, LLC www.pelvicglobal.comAdditional Tips:
Prioritize Pelvic Floor Rehab
Work with a pelvic floor physical therapist to retrain pelvic coordination, strength, and relaxation.
Learn how to contract (lift) and relax your pelvic floor appropriately during daily activities.
Use Breath and Pressure Strategies
Avoid breath-holding (Valsalva maneuver), especially when lifting, standing up, or having a bowel movement.
Exhale with effort — breathe out when you exert (e.g., during lifting, standing, or bending).
Support Good Bowel Habits
Prevent straining with constipation by:
Staying hydrated
Eating fiber-rich foods
Using a footstool during bowel movements
Avoid Heavy Lifting (Initially)
In the first few months post-op, avoid lifting more than 10–15 lbs unless cleared.
Even long-term, lift with proper mechanics and pelvic floor engagement.
Maintain a Healthy Body Weight
Excess weight increases abdominal pressure and load on pelvic tissues.
Moderate, consistent movement and healthy eating can help reduce strain.
Stay Active — But Smart
Return to exercise gradually and strategically (walking, core control, then strength).
Avoid high-impact or intra-abdominal pressure-heavy activities (e.g., jumping, heavy deadlifts) unless cleared.
Manage Chronic Cough or Allergies
Ongoing coughing increases downward pressure. Address underlying issues with your healthcare provider.
Be Mindful of Hormonal Changes
Estrogen helps maintain pelvic tissue strength. Postmenopausal women may benefit from local vaginal estrogen — talk to your provider to see if this is an appropriate option for you.
Follow Up With Your Surgeon and Pelvic PT
Regular follow-ups help monitor healing and detect early signs of recurrence.
Reassess symptoms during life changes (e.g., menopause, new fitness routines).